
Guide contents
- 1. What MeshWX Pro App does
- 2. Before you start
- 3. Install MeshWX Pro App (pick one path)
- 4. Open the dashboard
- 5. Pick your region
- 6. US setup: coverage, alerts, IPAWS
- 7. Europe: MeteoAlarm coverage
- 8. Canada and Australia
- 9. Connect your radios
- 10. Send a test
- 11. Go live
- 12. Manual send
- 13. Live vs. test channels
- 14. Configuration & data
- 15. Troubleshooting
- 16. Keep it running when the grid goes down
Overview
What the MeshWX Pro App does
When a hurricane or flood takes out the towers, a LoRa mesh often keeps working, but the mesh has no way to know a warning was issued. MeshWX Pro App bridges that gap. It polls an official alert feed on a schedule, decides what is worth sending, trims each alert to fit a LoRa packet, and transmits it to everyone on your channel.
- Four regions. United States (NWS + FEMA IPAWS), Europe (MeteoAlarm, about 39 countries), Canada (Environment Canada), and Australia (Bureau of Meteorology). One source runs at a time.
- Dual radio. Run Meshtastic, MeshCore, or both at once. Every alert goes to each enabled radio on its own channel.
- Smart filtering, no spam. Broadcasts the warnings you choose, never resends the same alert, sends one concise update when a warning changes and a cancellation when it clears.
- Fits a packet. Alerts trim to 195 bytes, for example
[WX] Tornado Warning: Charleston +2 more until 8:45 PM EDT. - Paused by default. Automated alerts are logged, not transmitted, until you flip it live.
MeshWX Pro App depends on your internet connection to reach the alert feed, on your hardware, and on LoRa propagation. Do not rely on it as your only source of life-safety alerts. Always keep an official channel: a weather radio, wireless emergency alerts, or local sirens. Test it paused before you trust it.
Prerequisites
Before you start
You need three things:
- A computer that stays on. A Raspberry Pi (64-bit OS), any Linux box, macOS, or a Windows PC. It draws little power, so a Pi on a small UPS or solar battery is ideal.
- A supported LoRa radio flashed with Meshtastic or MeshCore firmware, connected by USB or reachable on your network.
- Internet for the machine running MeshWX Pro App, so it can reach the alert feed.
Whichever install path you pick, MeshWX Pro App runs one small web app. When it is up you open
http://<host>:8110 in a browser and do the rest of the setup on screen.
Replace <host> with the machine's IP address, or
localhost if you are on that machine.
Installation
Install the MeshWX Pro App (pick one path)
All three paths run the exact same app. Download the pieces you need from meshwxpro.com, then follow the matching card.
🐳 Docker (recommended)
From meshwxpro.com, download the image tarball for your CPU and the
docker-compose.yml, and put them in the same folder:
- PC or server (Intel / AMD):
meshwx-amd64.tar.gz - Raspberry Pi (64-bit OS):
meshwx-arm64.tar.gz
gunzip -c meshwx-amd64.tar.gz | docker load   # arm64 tarball on a Pi
docker compose up -d
# open http://localhost:8110  (or http://<host-ip>:8110)
The compose file grants the container the USB-serial device classes and mounts
/dev, so a port renumbering never needs a config edit. It also sets
restart: unless-stopped, so MeshWX Pro App comes back after a reboot on its own.
🍽 Raspberry Pi (headless, starts on boot)
Use the arm64 image. If the Pi has no Docker yet, install it once, then load and start MeshWX Pro App:
curl -fsSL https://get.docker.com | sh        # one time: install Docker
sudo usermod -aG docker $USER; newgrp docker
gunzip -c meshwx-arm64.tar.gz | docker load
docker compose up -d
Plug your radio into USB, then open http://<pi-ip>:8110 from any browser on your network.
64-bit Raspberry Pi OS uses the arm64 image. A very old 32-bit Pi (armv7) is not covered, install the 64-bit OS.
🧂 Windows
Download the zip
Get
MeshWX-windows.zipfrom meshwxpro.com.Unzip and run
Unzip anywhere and double-click MeshWX.exe. No Python install required.
The dashboard opens itself
Your browser opens to the dashboard automatically. Keep the console window open; closing it stops MeshWX Pro App.
Windows SmartScreen may warn about an unrecognized app until the build is code-signed. Choose More info → Run anyway.
Orientation
Open the dashboard
Browse to http://<host>:8110. This is the home screen. On a fresh
install it tells you exactly what is not ready yet: no radio connected, and broadcasting
PAUSED. That is expected, you fix both during setup.
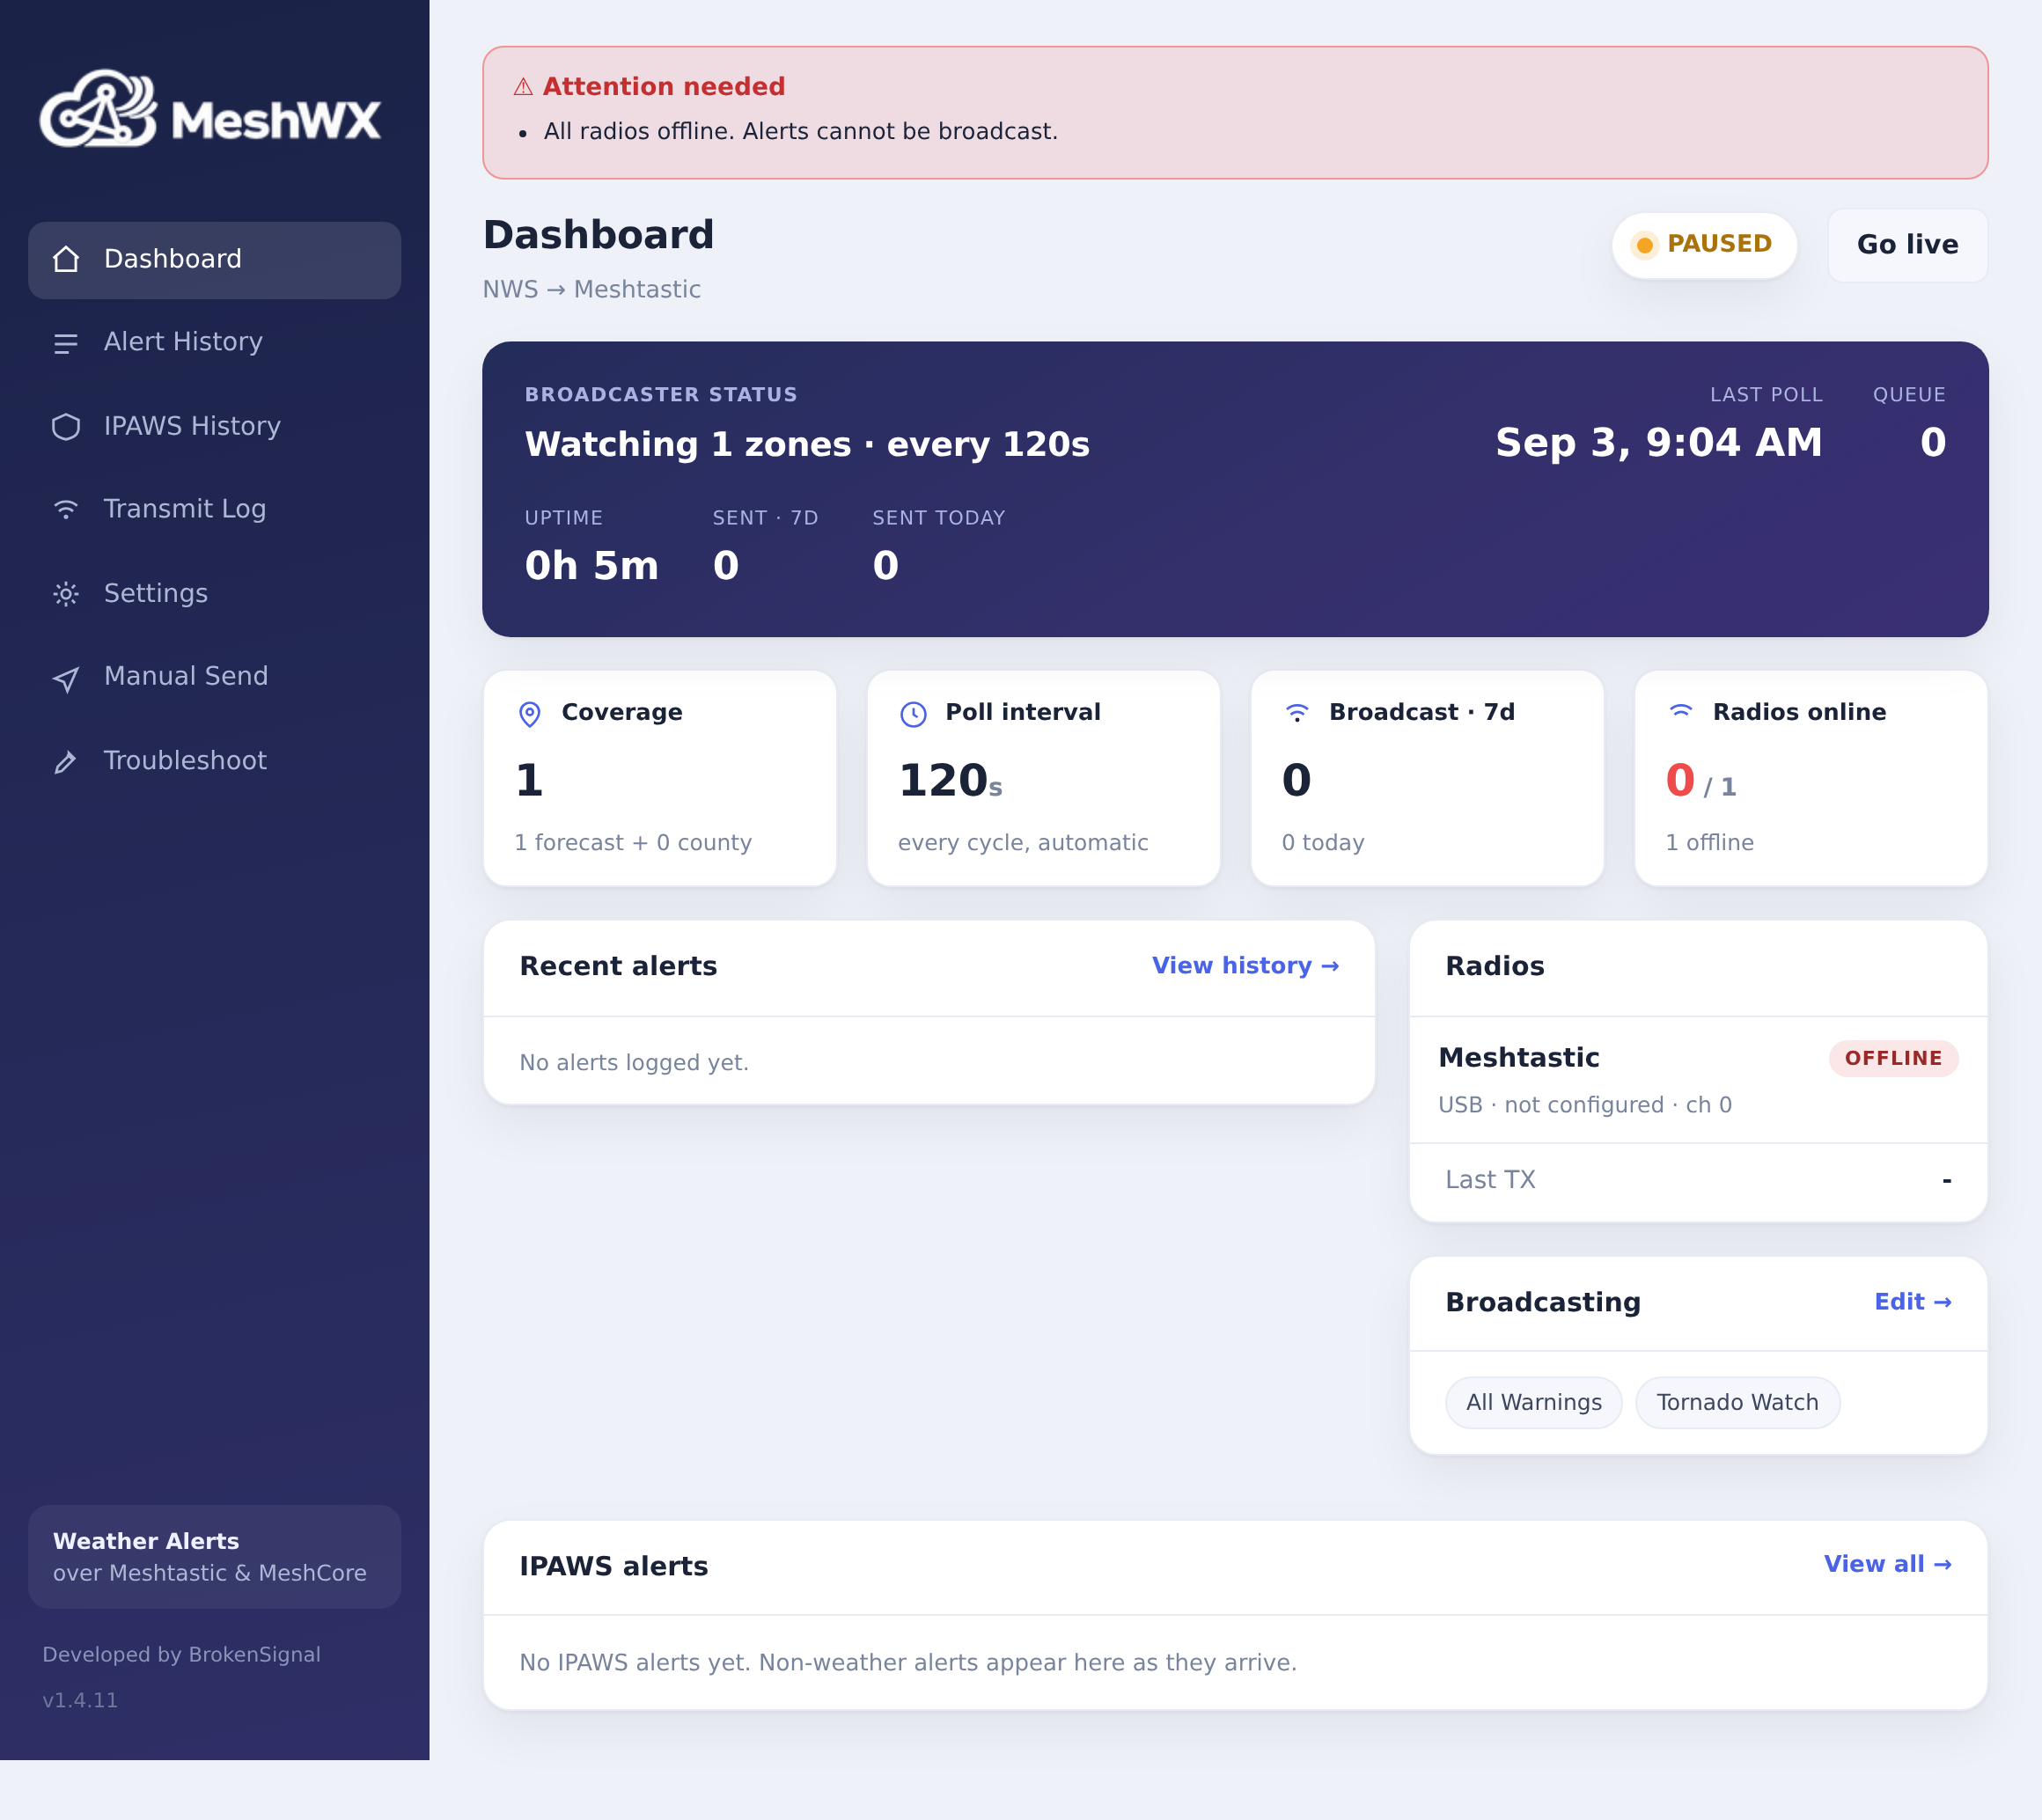
- PAUSED / Go live (top right) is the master switch. Leave it paused until the end.
- Attention needed lists anything blocking broadcasts, here “All radios offline.”
- The left rail is the menu you will use: Settings, Troubleshoot, Manual Send, and the logs.
Everything from here on lives under Settings. Work top to bottom.
Setup · step 1
Pick your region
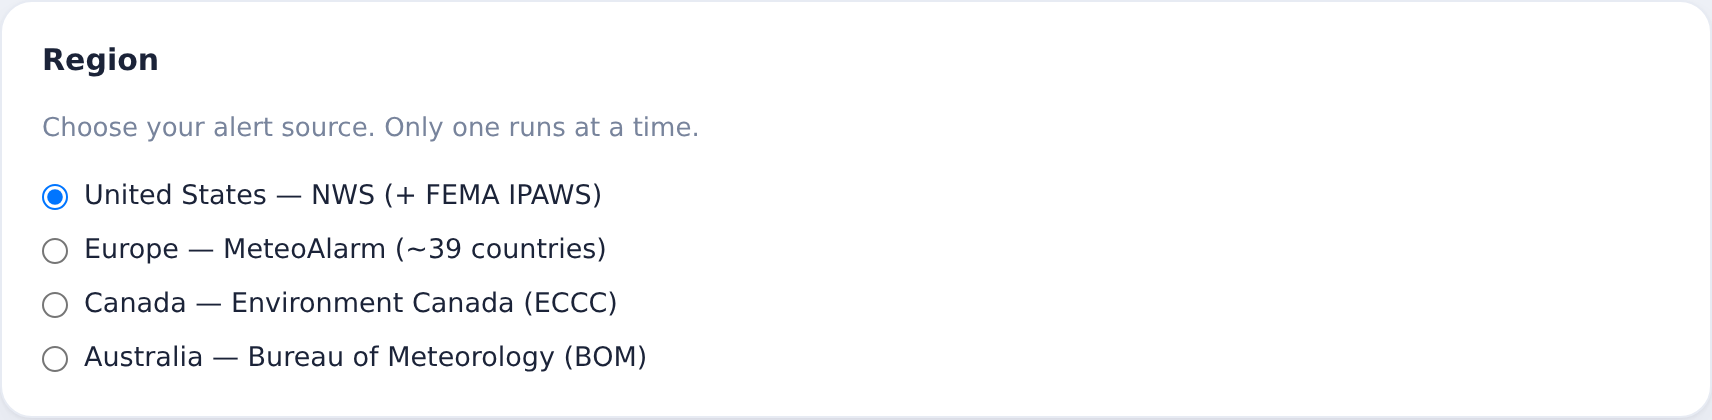
Open Settings. The first panel is Region: your alert source. Pick one, only one runs at a time. The rest of the Settings page changes to match your choice, so the panels you see below depend on what you pick here.
Scroll to the NOAA panel (US) or the equivalent and set the contact email. The US NWS feed requires a contact string on every request; the placeholder can get you rate-limited. It is never broadcast.
Setup · United States
US setup: coverage, alerts, IPAWS
With United States selected, three panels drive what you broadcast.
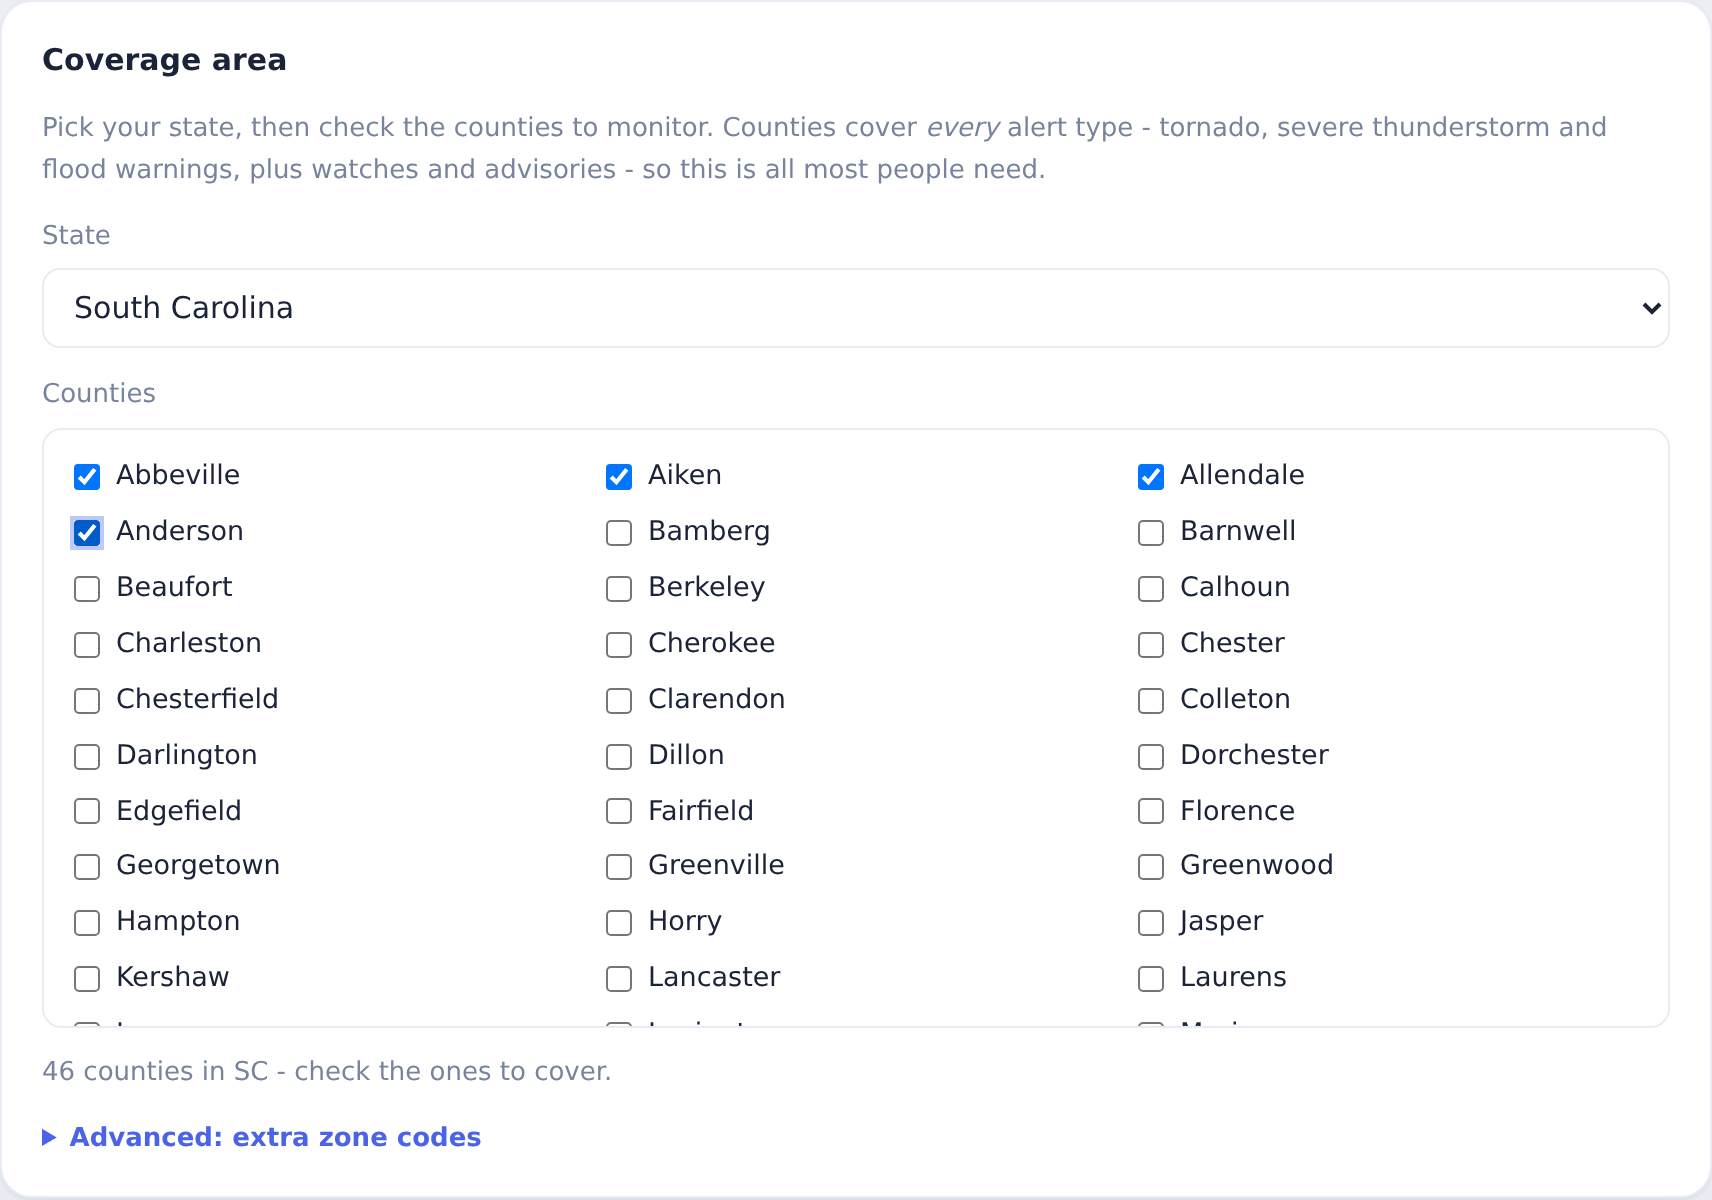
Coverage area: pick your counties
Choose your state, then tick the counties to monitor. Counties cover every alert type, tornado, severe thunderstorm and flood warnings plus watches and advisories, so for most people this is the only coverage step needed. There is nothing to type.
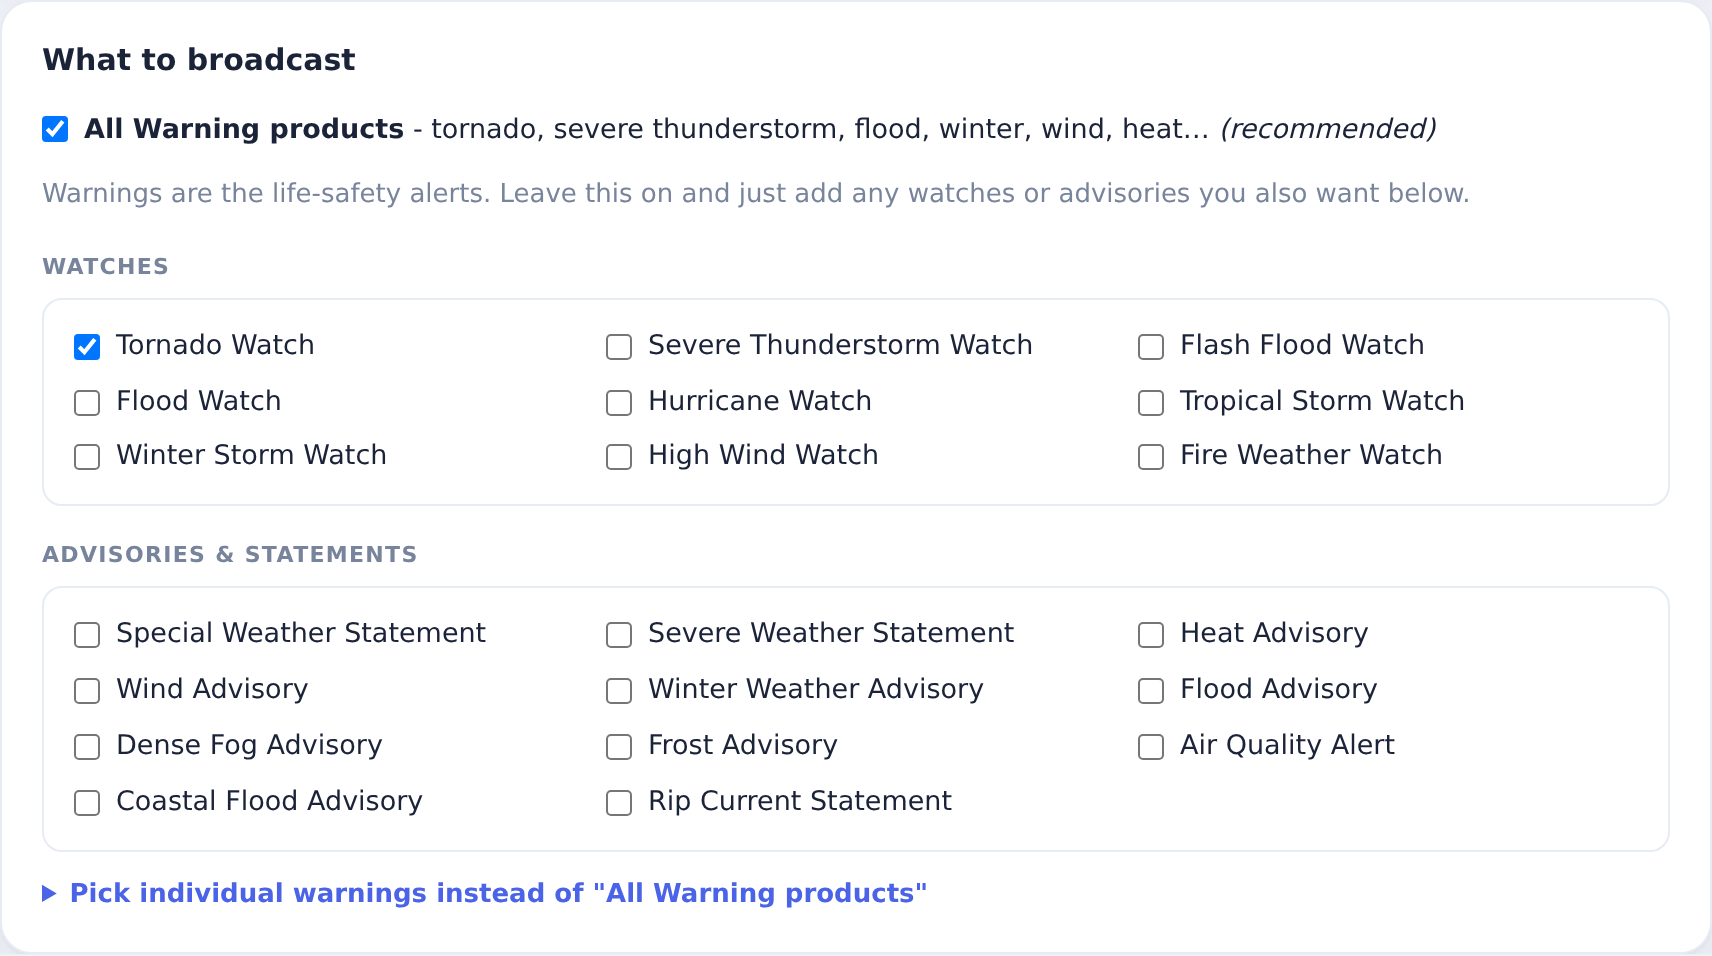
What to broadcast
Leave All Warning products on, those are the life-safety alerts. Then add any Watches or Advisories you also want from the checklists. An Advanced section lets you pick individual warning types instead of all of them.
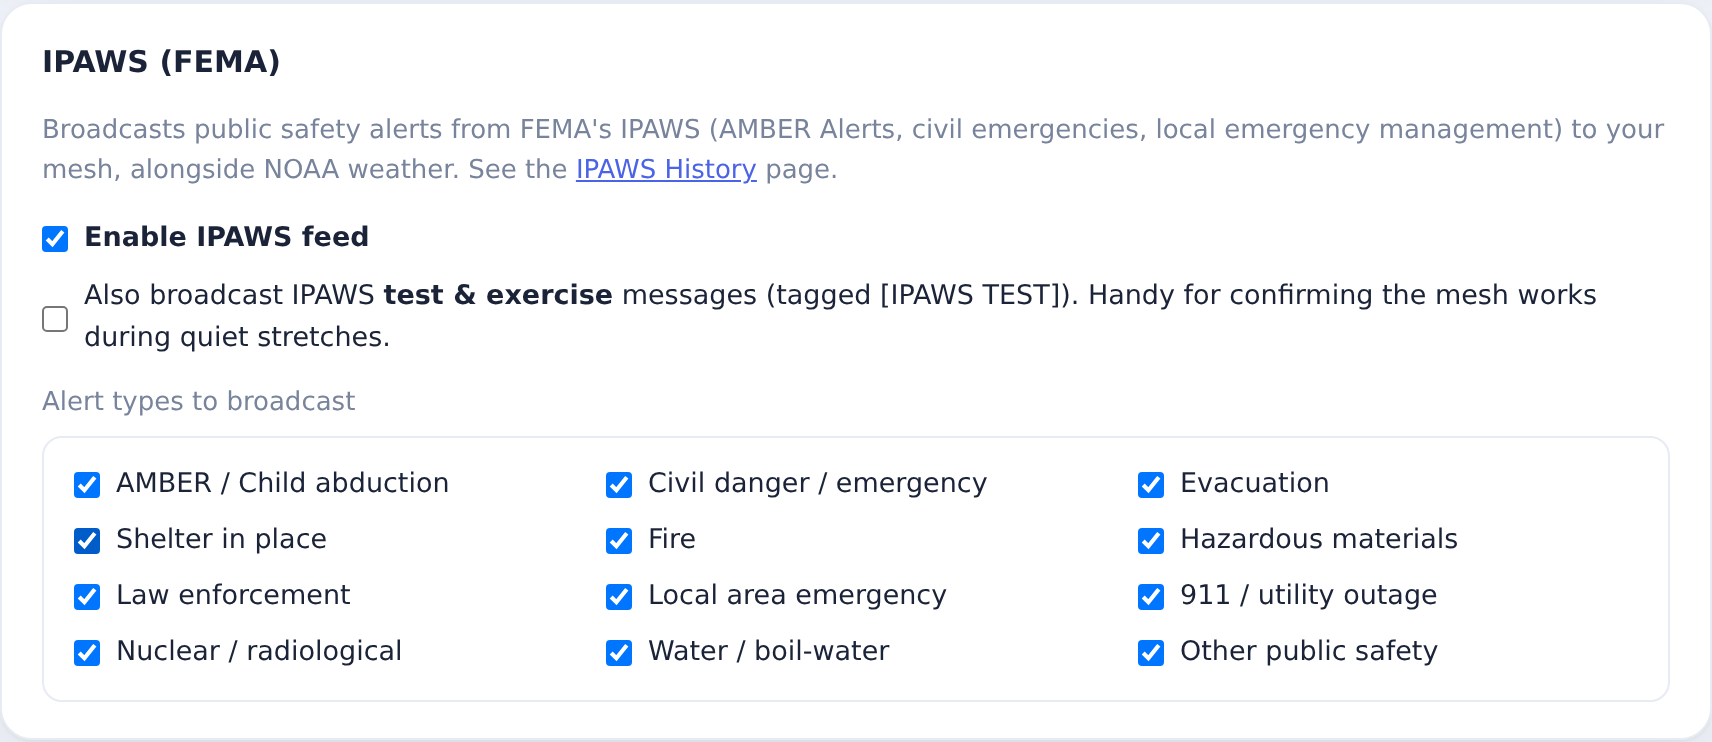
IPAWS (US only): non-weather public safety
Optionally broadcast FEMA IPAWS alerts alongside weather: AMBER Alerts, civil emergencies, evacuations, and local emergency management. Enable the feed and tick which types to carry. It is scoped to the same counties you picked above.
Setup · Europe
Europe: MeteoAlarm coverage
Set Region to Europe and the International coverage panel appears. Pick your country (about 39 are covered). MeshWX Pro App then loads that country's full named region list, no codes to type. Leave every region unchecked to watch the whole country, or tick the specific regions you want.
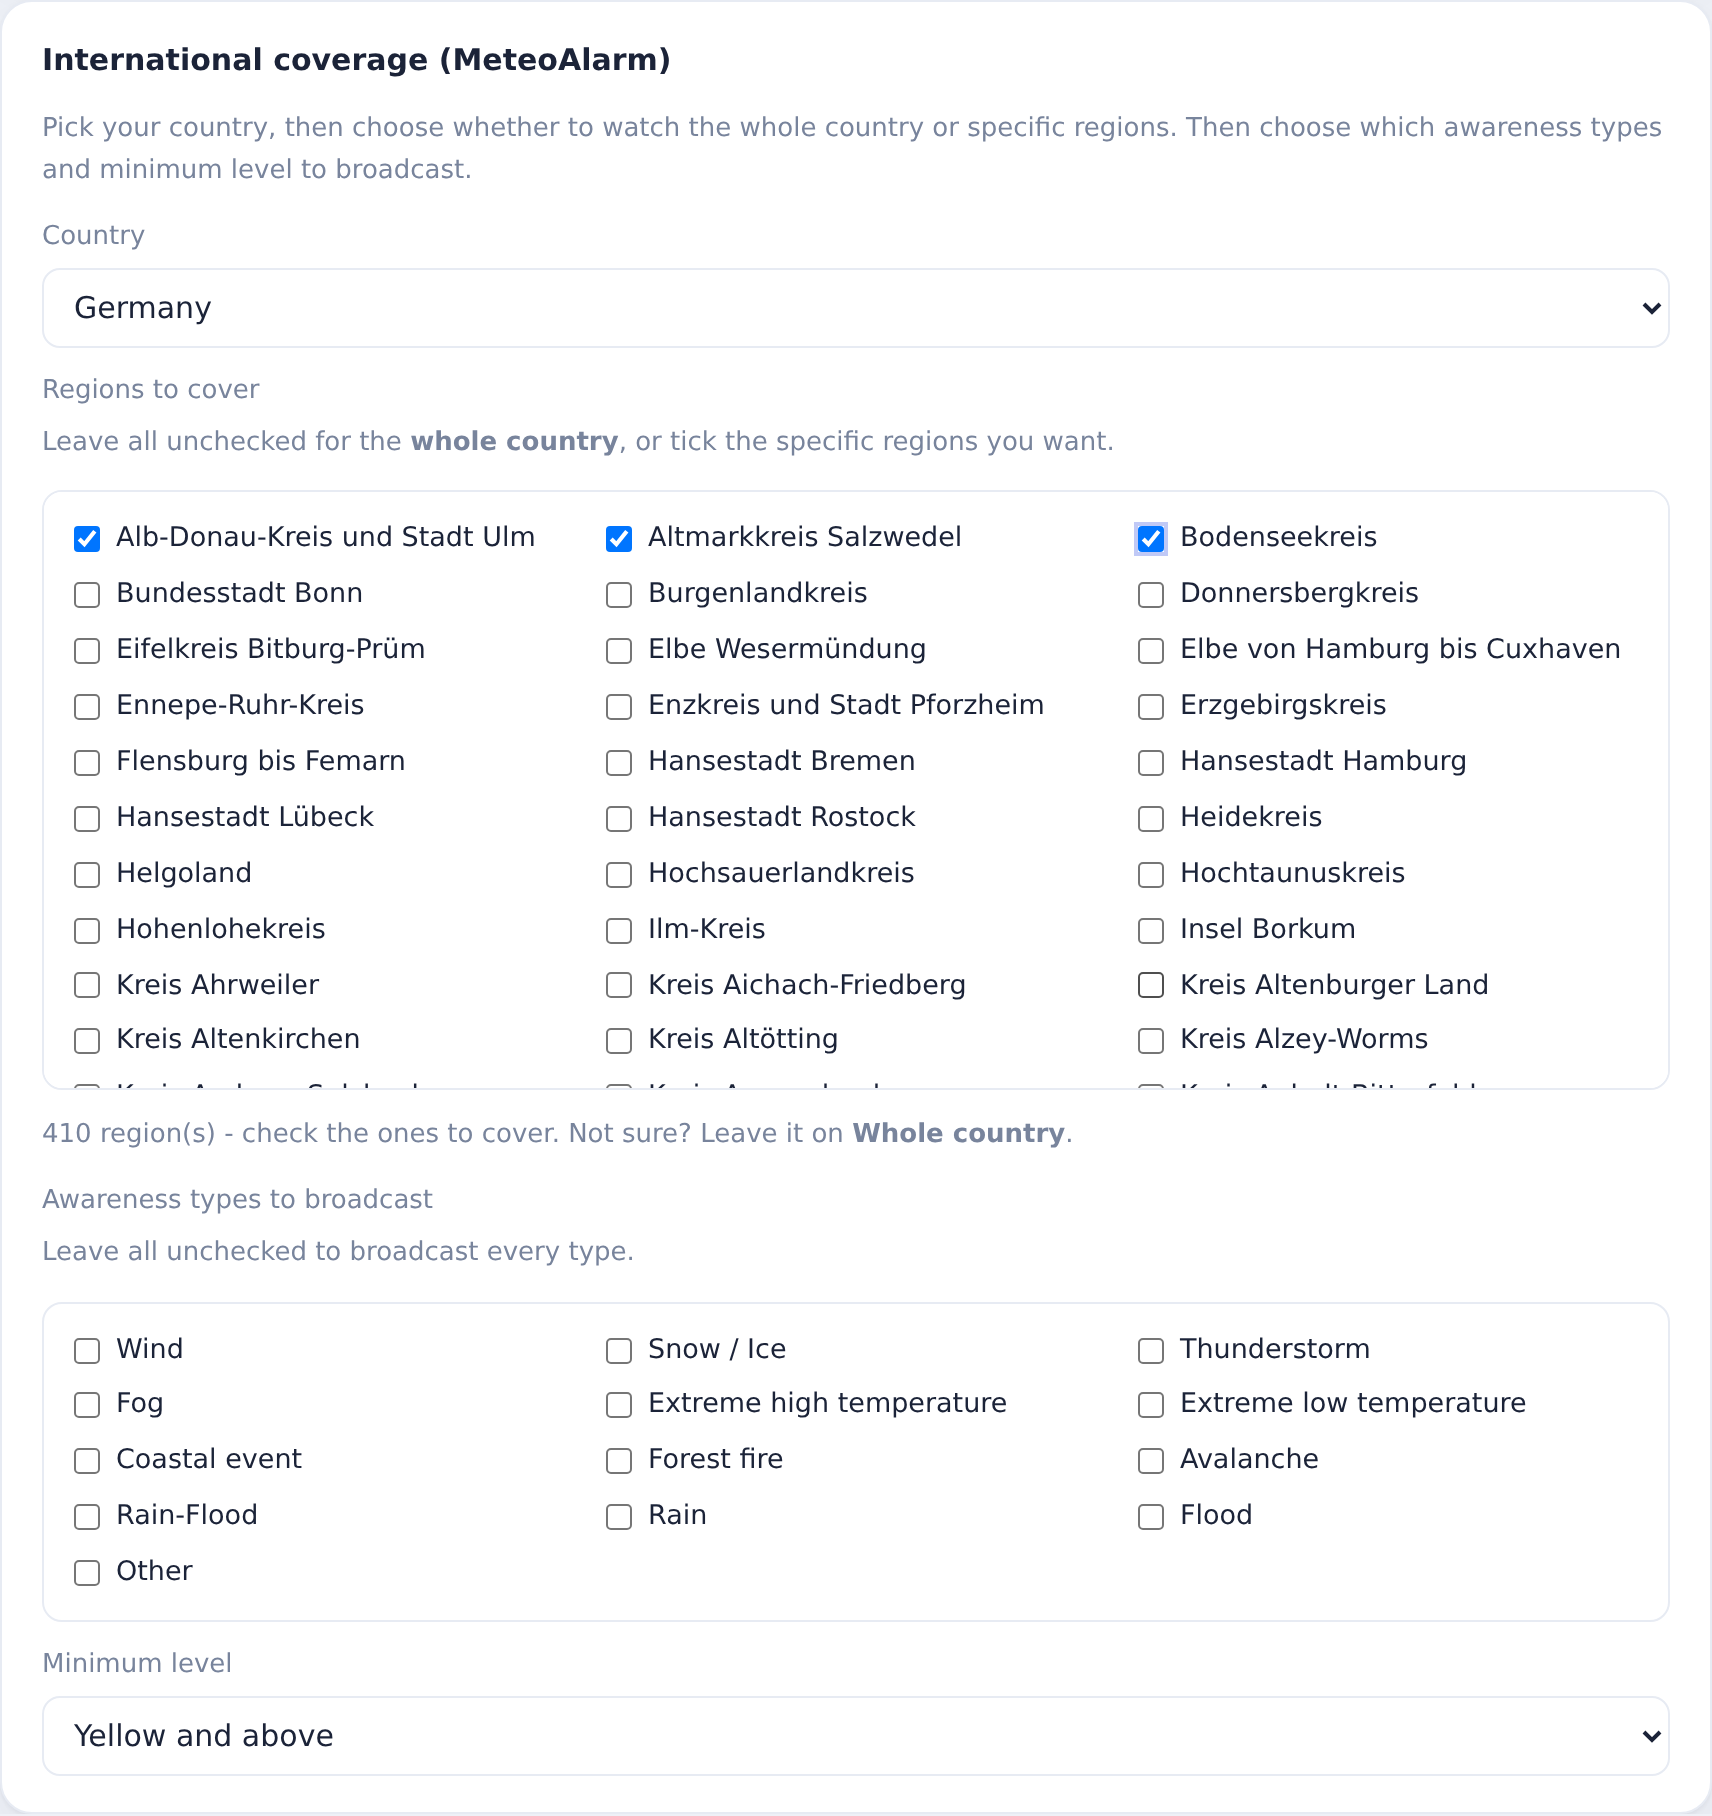
- Regions to cover: leave all unchecked for the whole country, or tick specific regions.
- Awareness types: leave all unchecked to broadcast every type, or narrow to the hazards you care about.
- Minimum level: green and above, yellow and above, orange and above, or red only. Yellow-and-above is the sensible default.
Setup · Canada & Australia
Canada and Australia
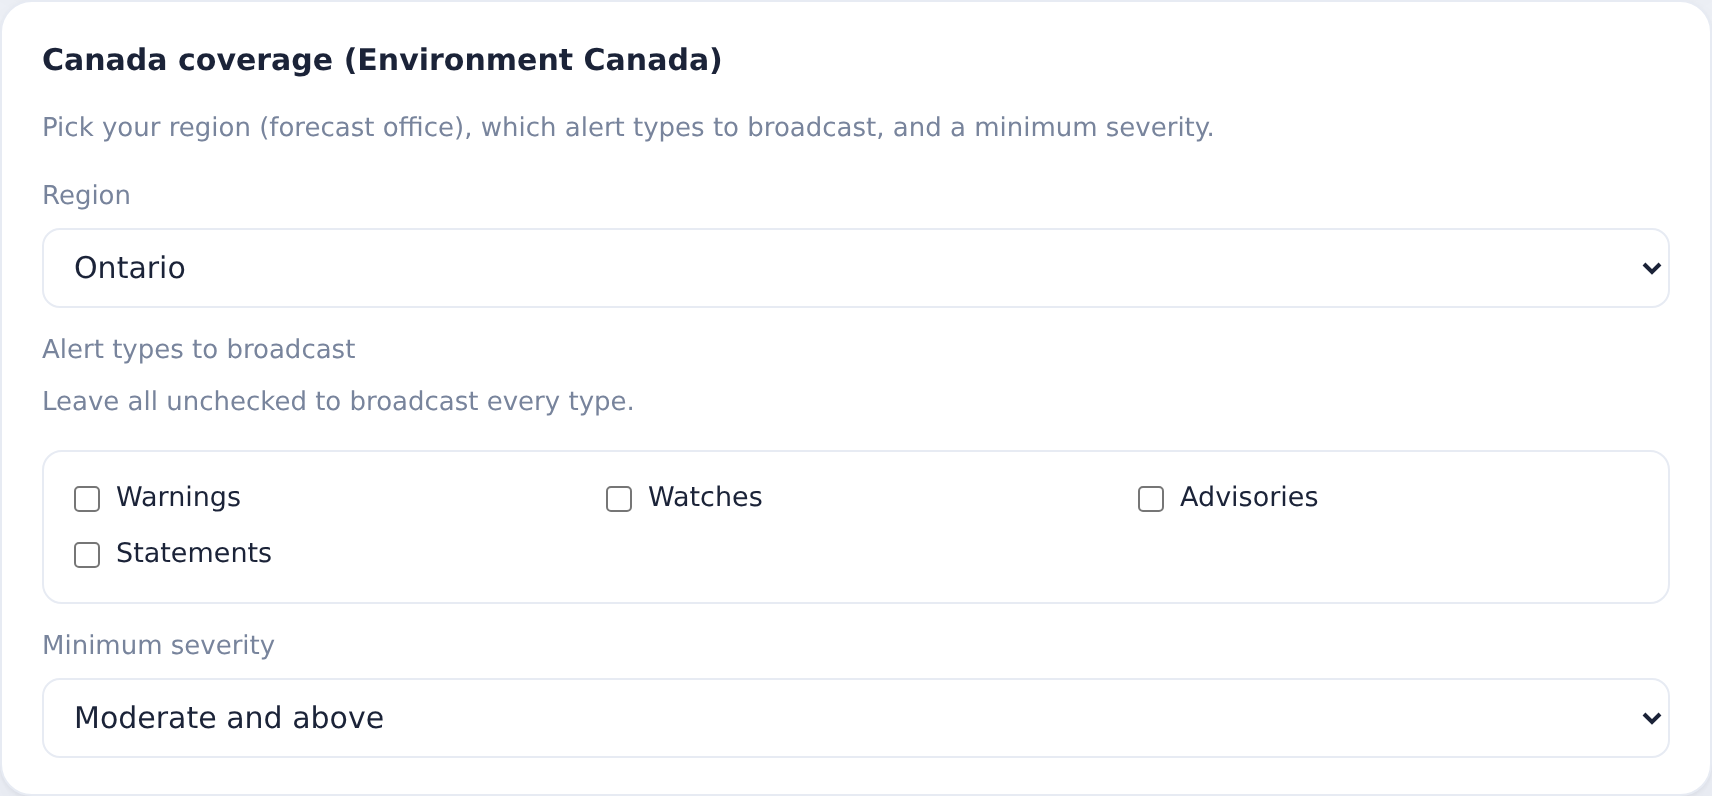
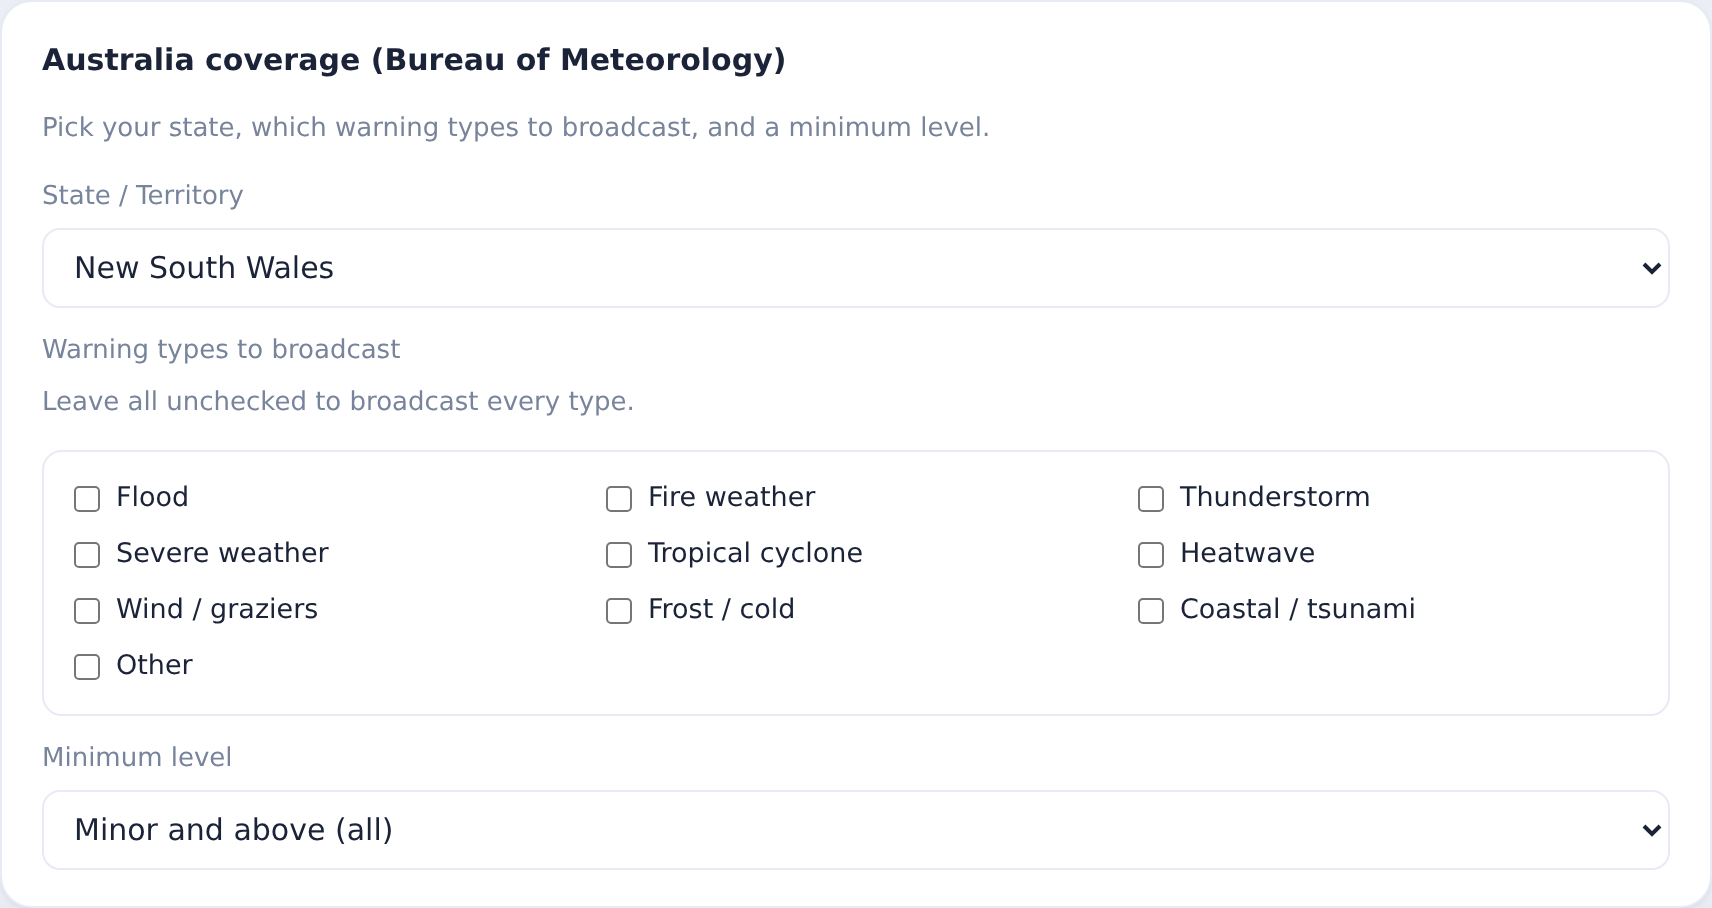
The other two regions work the same way: pick your area, choose which alert types, and set a minimum severity.
Canada (Environment Canada)
Pick your forecast-office region, the alert types to broadcast, and a minimum severity from minor up to extreme.
Australia (Bureau of Meteorology)
Pick your state or territory, the warning types, and a minimum level from minor up to major.
Setup · step 3
Connect your radios
Scroll to the Radios panel. Enable Meshtastic, MeshCore, or both. For each: pick the connection, click Connect & load channels, then choose which channel carries live alerts and which carries test messages.
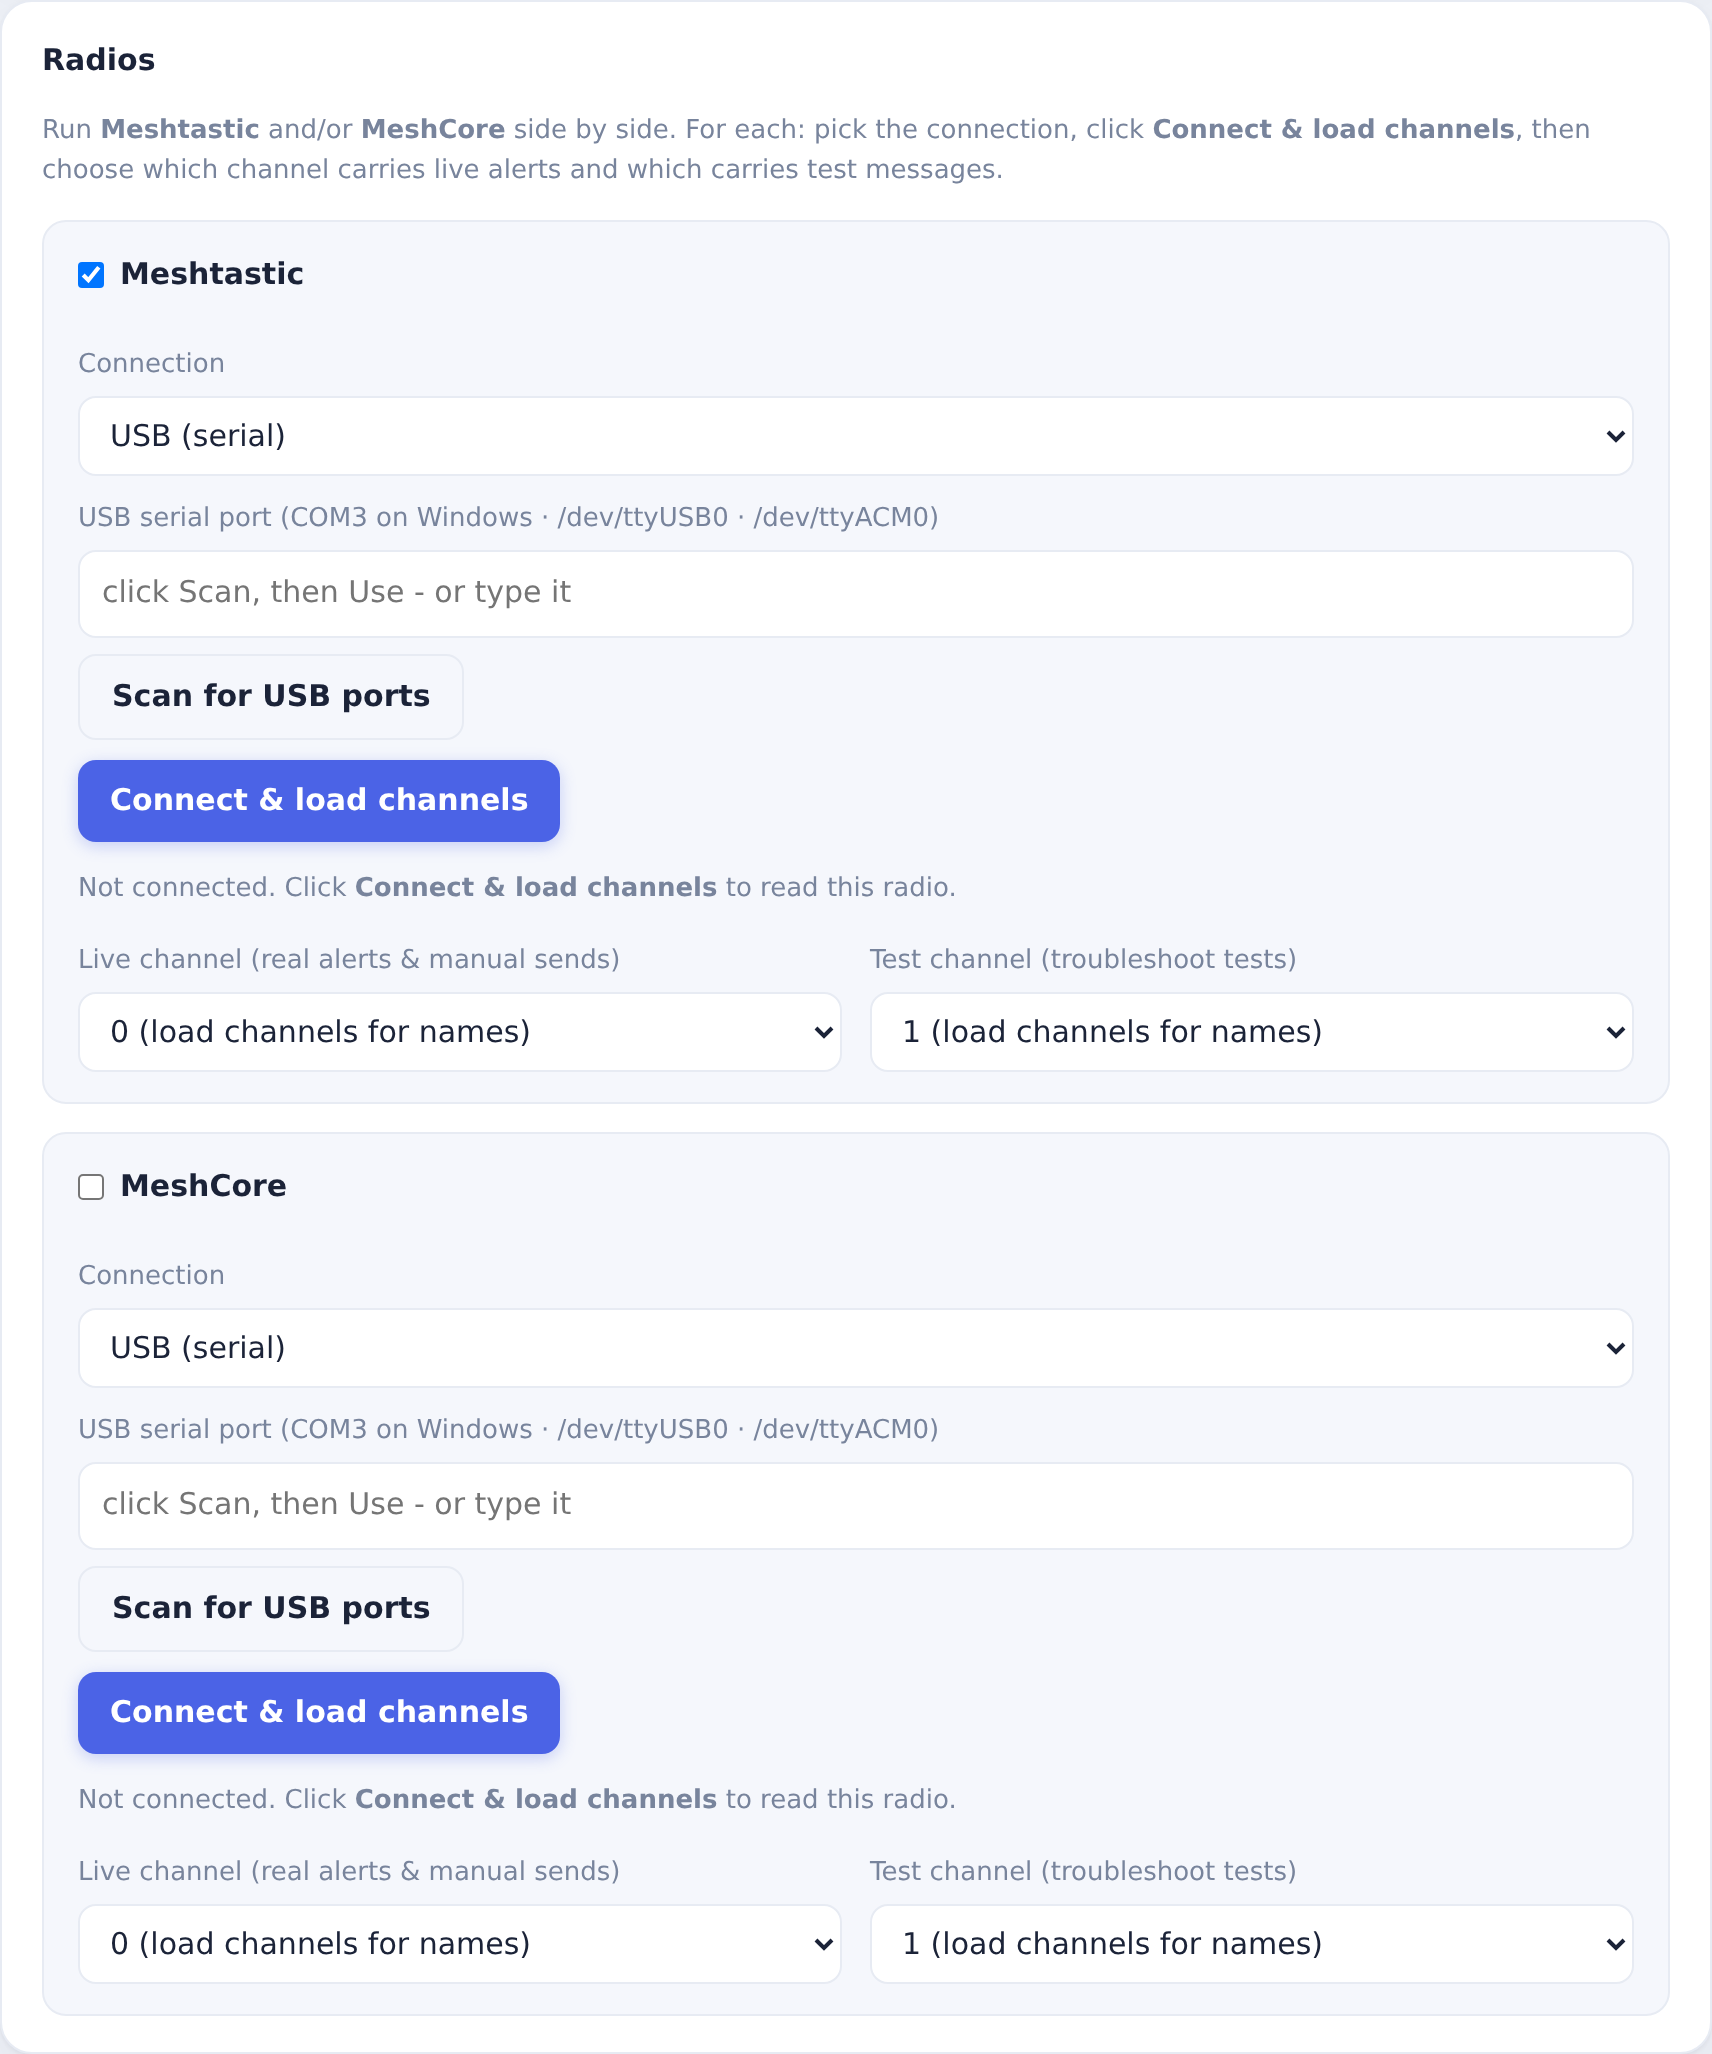
- USB (serial): click Scan for USB ports and pick yours, or type it (
COM3on Windows,/dev/ttyUSB0or/dev/ttyACM0on Linux). Leave it blank to auto-discover. - Network (IP / TCP): enter a WiFi node's address, e.g.
192.168.1.50. - MeshCore: flash the board with the USB companion firmware, not repeater firmware. Repeater firmware exposes no serial API, so MeshWX Pro App cannot drive it.
- Click Connect & load channels to read the radio, then set the Live and Test channels. Press Save settings at the bottom.
Setup · step 4
Send a test
Before trusting it, confirm the radio actually keys up. Go to Troubleshoot and click Test Meshtastic (and Test MeshCore if enabled). The test always sends, even while broadcasting is paused, and goes out on the test channel (channel 1), never the live channel. Watch for it on another node.
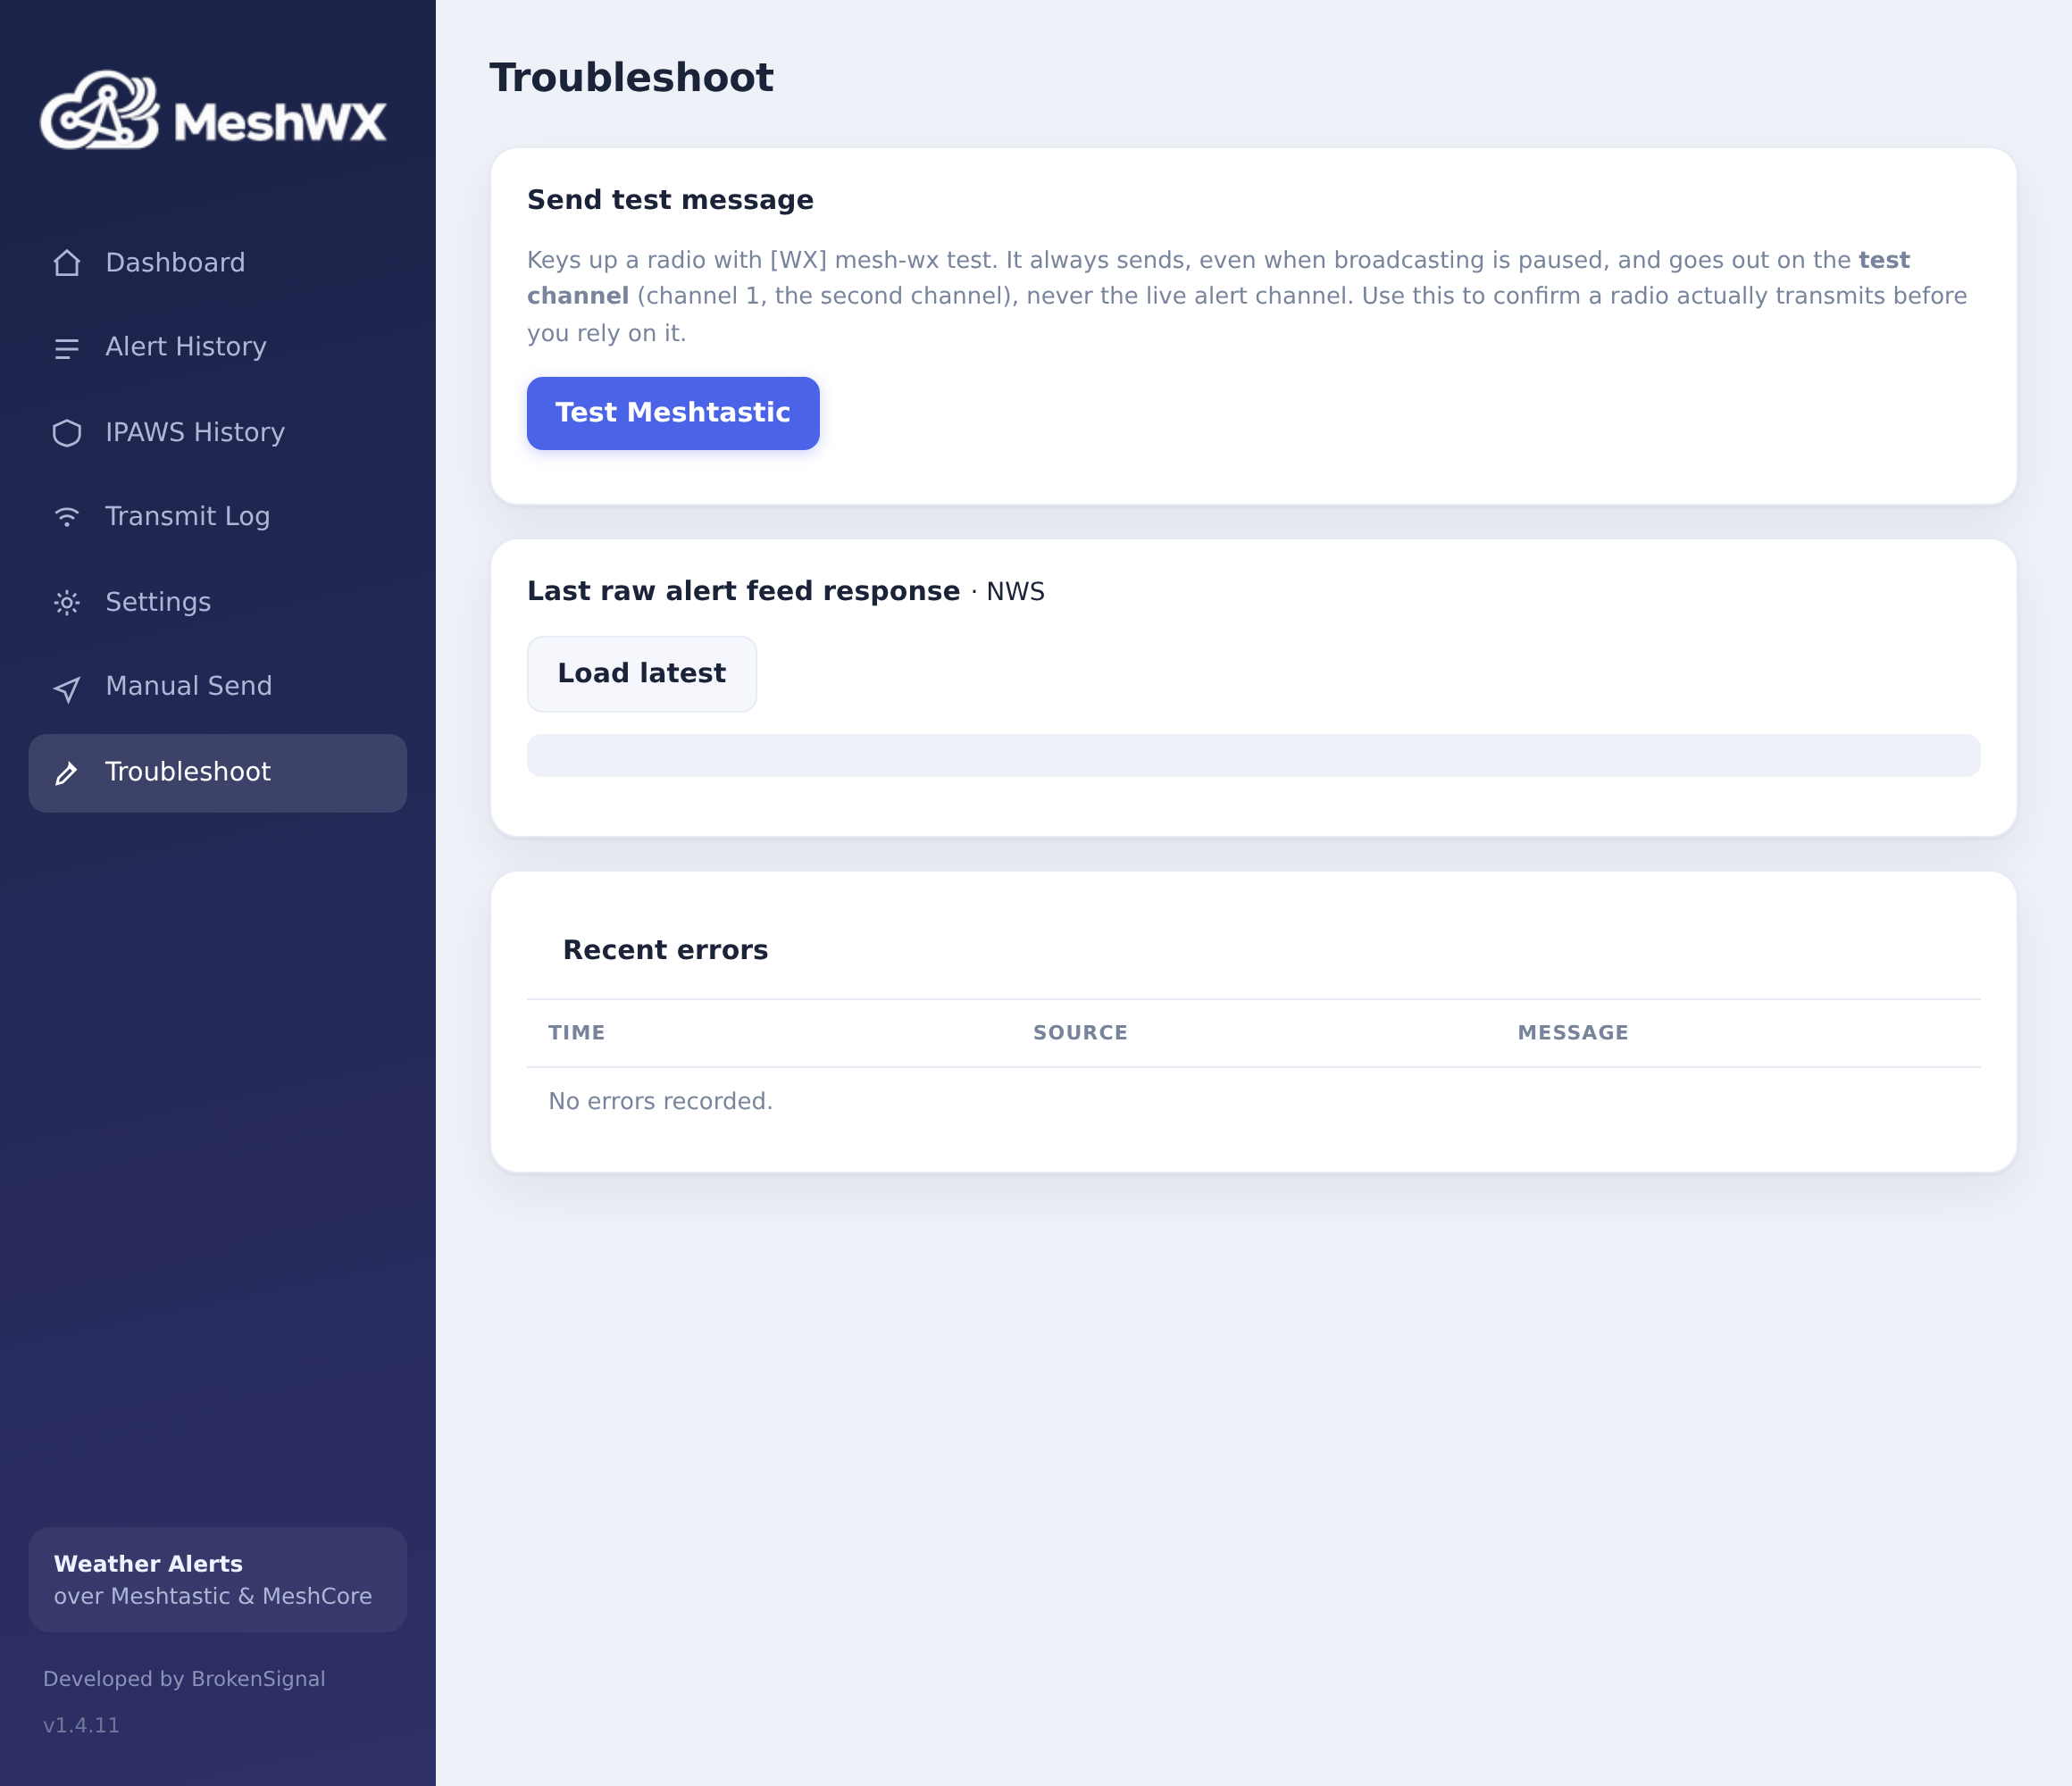
LoRa broadcasts are unacknowledged, so a radio can report success without transmitting. MeshWX Pro App confirms each send against the radio's own transmit counter: a message is logged sent only when the radio really keyed up, otherwise it retries and logs failed. Check the Transmit Log to see which.
Setup · step 5
Go live
Once a real alert or two has shown up correctly in Alert History while paused, and your test transmitted, go back to the Dashboard and click Go live (the PAUSED pill flips to LIVE). From then on, real alerts broadcast automatically on the live channel.
Click the pill back to PAUSED on the Dashboard. Automated alerts stop immediately; the manual-send and per-radio test buttons still work.
Optional
Manual send
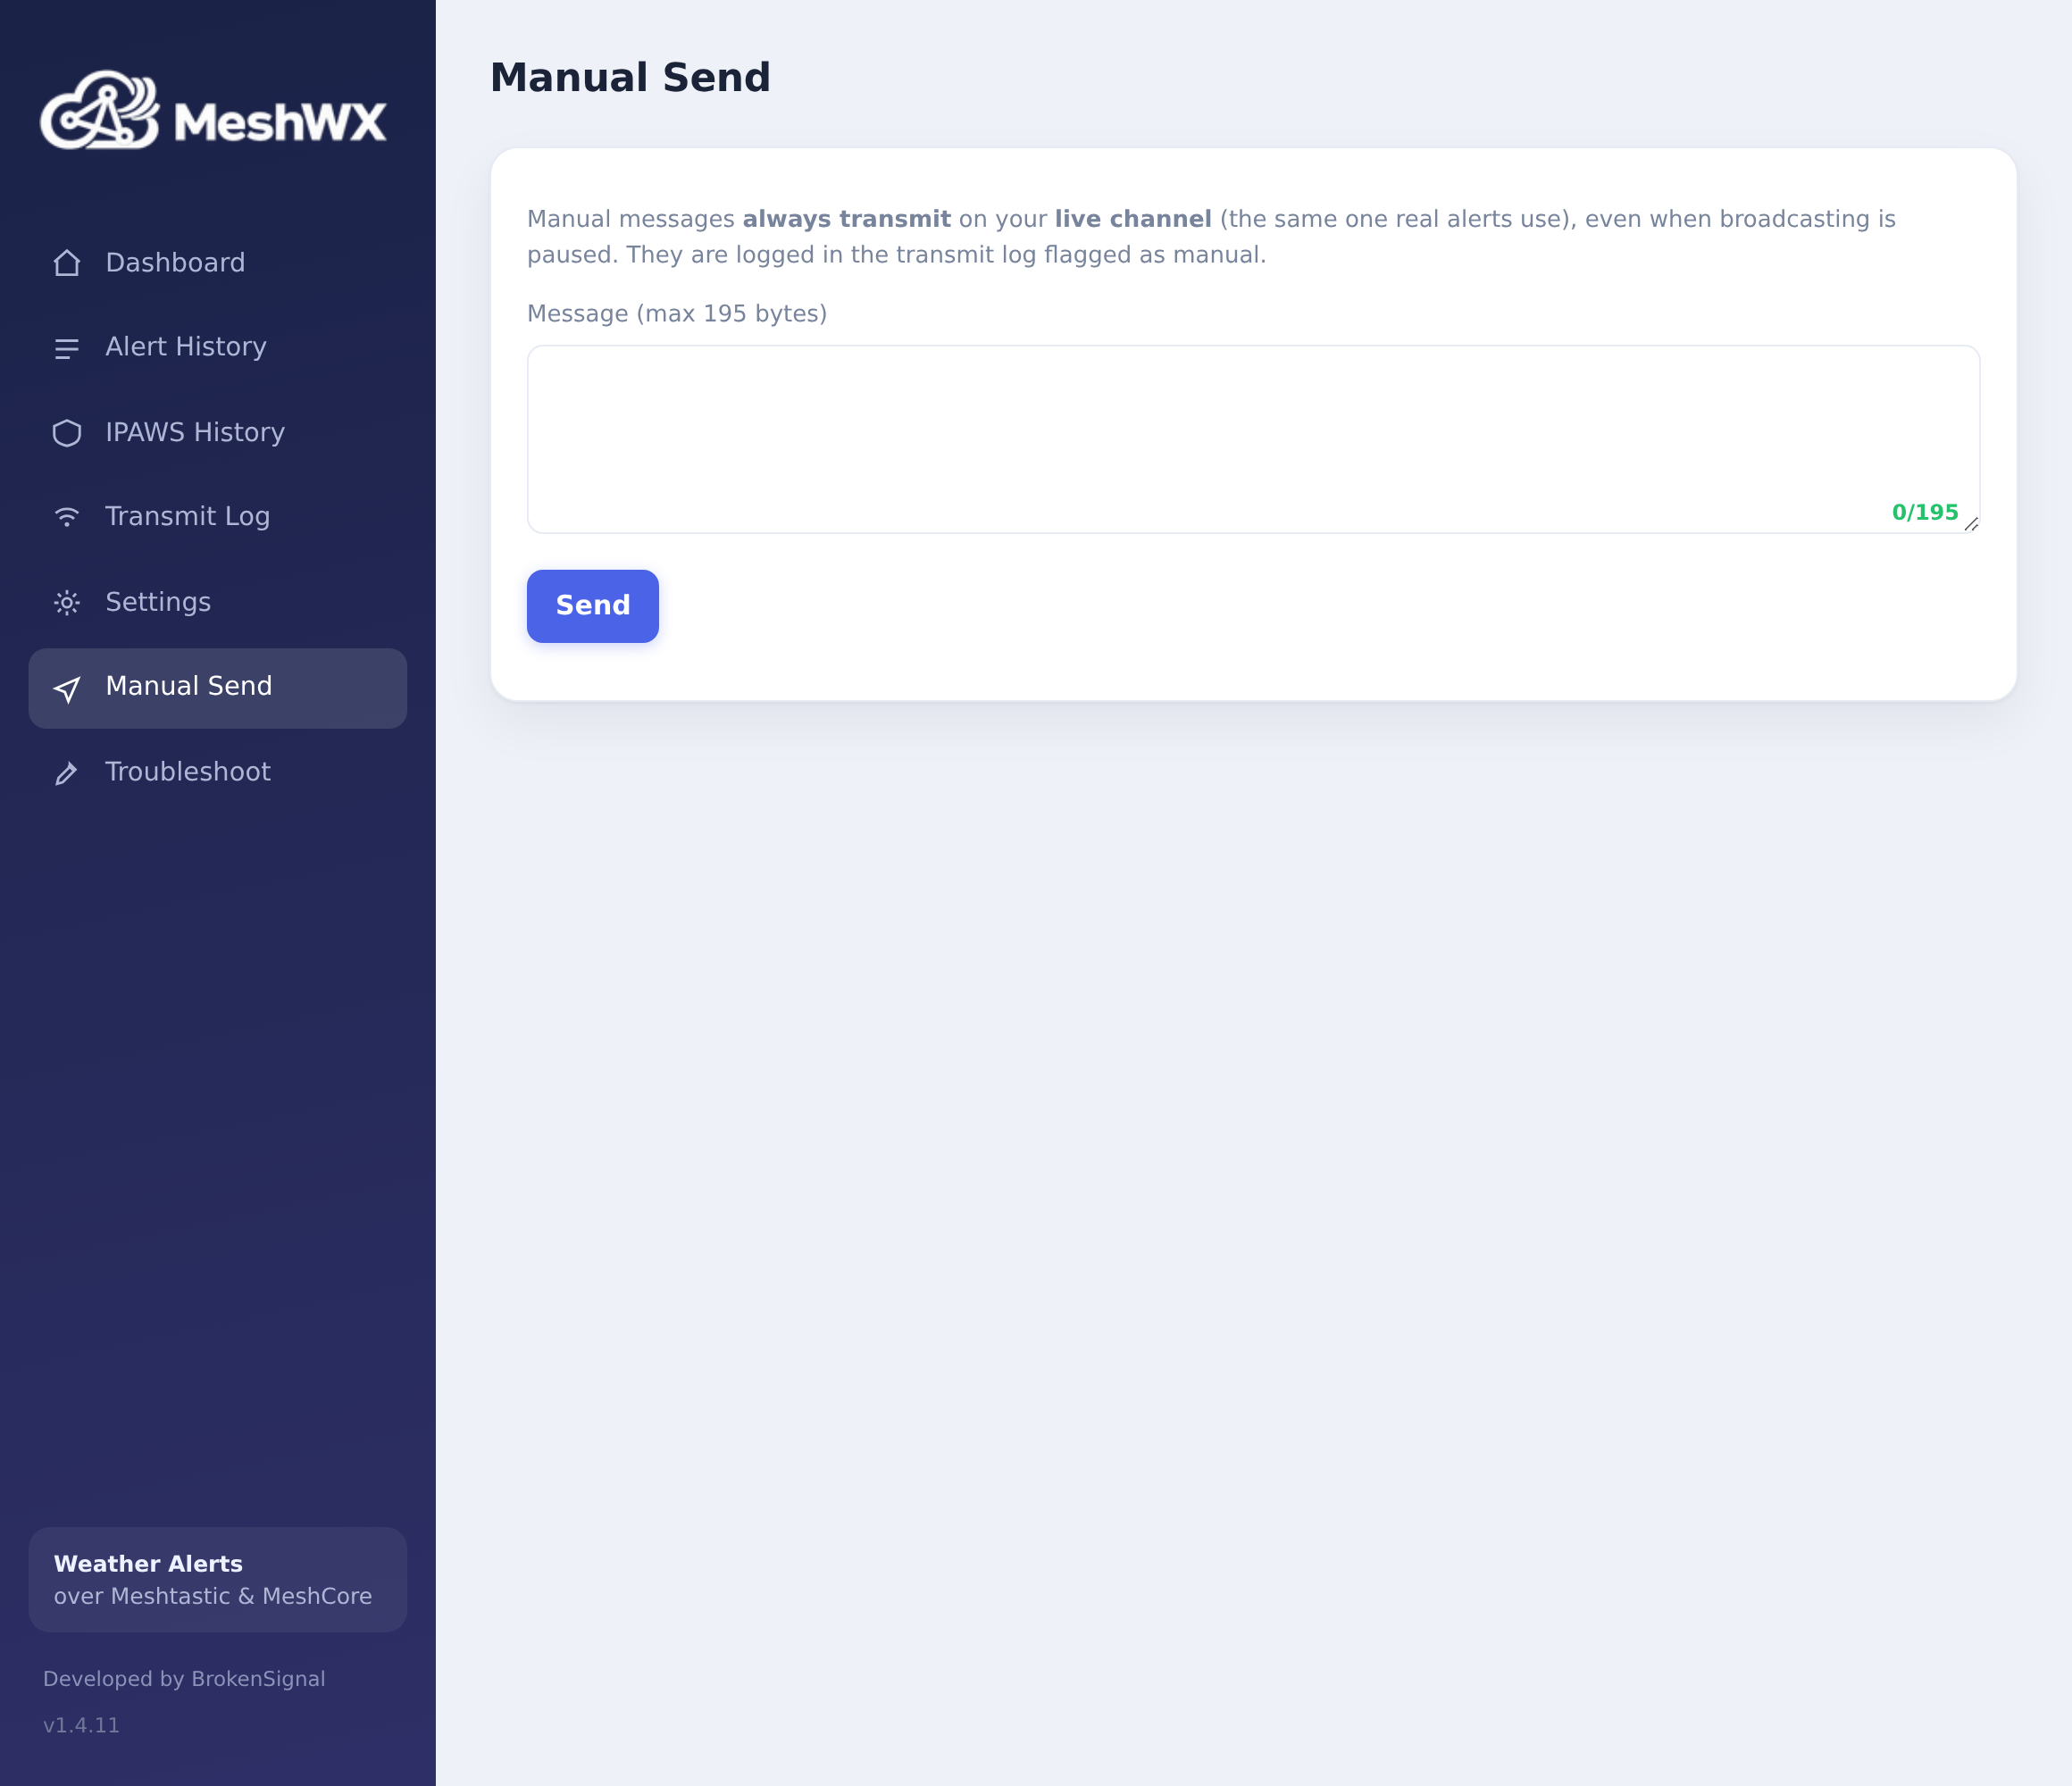
The Manual Send page broadcasts a message you type to everyone on the mesh, on the live channel (these are real messages for people, so they do not use the test channel). Useful for an all-clear or local note the feeds will not carry.
Reference
Live vs. test channels
MeshWX Pro App keeps testing off the channel people actually watch:
- Channel 0 is the live channel. Real alerts (and manual sends) broadcast there.
- Channel 1 is the test channel. The Troubleshoot test buttons transmit there, so testing never clutters the live alert channel.
Both are set per radio in the Radios panel. Point your listening node at channel 0 for real alerts, or channel 1 to watch tests.
Reference
Configuration & data
Almost everything is configured in the dashboard. Only three settings come from the environment, and only because they are needed to boot:
| Variable | Default | Purpose |
|---|---|---|
MESH_WX_PORT | 8000 (Docker maps it to 8110) | HTTP port |
MESH_WX_HOST | 0.0.0.0 | HTTP bind address |
MESH_WX_DB | per-OS data dir (below) | SQLite database path |
Where your data lives
Settings, history, the transmit log, and dedupe state are all in one SQLite database. Back this up, not the image or the exe:
- Docker
- the
./datafolder next to yourdocker-compose.yml - Windows
%LOCALAPPDATA%\MeshWX
Help
Troubleshooting
The dashboard will not load
Confirm the app is running and you are using the right address. On Docker,
docker compose ps to see it is up and docker compose logs -f
to read its output. On Windows, keep the console window open. Check nothing else uses port 8110 and that
you are pointing the browser at the machine's real IP.
The radio will not connect
- Docker cannot see the USB radio: plug it in before
docker compose up -d, and run compose from the folder with the provideddocker-compose.yml(it carries the USB device rules). - Port renumbered: leave the port blank to auto-discover, or reselect it after a replug.
- MeshCore says not connected: the board is almost certainly on repeater firmware. Reflash it with the USB companion build.
- Two identical boards: their USB serial IDs can collide. Pick the raw port (
/dev/ttyUSB0vs/dev/ttyUSB1) rather than the by-id name.
A test sends but nothing arrives
Check the listening node is on the same channel the test uses (channel 1) and on the same LoRa preset and region as the transmitting radio. In the Transmit Log, sent means the radio keyed up (problem is on the receiving side or propagation); failed means it never left the radio.
It missed an alert I expected
Confirm the area is selected in your region's Coverage panel and the alert type is enabled in what to broadcast. Remember watches and advisories are off by default unless you add them.
Resilience
Keep it running when the grid goes down
MeshWX Pro App only helps if it is still up when the weather turns bad, which is exactly when grid power and internet tend to fail. Plan for both.
- Power: run it on battery, solar, or a UPS. A Pi and a LoRa radio draw very little. Put your listening nodes on backup power too.
- Internet: use a resilient link. MeshWX Pro App polls the alert feed over the internet, so if your cable dies with the grid it goes quiet. A satellite link such as Starlink on its own battery keeps alerts flowing.
- Know the limit: with no internet and no backup path, MeshWX Pro App cannot fetch new alerts. It is a bridge from the feed to your mesh, not a weather source of its own. Keep a weather radio as the offline fallback.
Ready to run MeshWX Pro App?
Download the App, connect a tested Meshtastic or MeshCore radio, and follow the guide from installation through your first verified test message.